Building a distributed Kubernetes platform from scratch
Author: Ananda Kammampati
While I was building VMware Photon-1.2 platform on my Intel NUC, I ran into some challenges running the Worker node VMs successfully (hence the reason, I couldn’t continue on Part-2). While trying to debug the problem, soon I realize that I need to understand the Kubernetes platform a lot better.
So in this article, I am venturing into build a scalable distributed Kubernetes platform for scratch. My approach is always the same - to understand what it takes to build any platform in a distributed manner so that, we can have a better understanding on all the moving parts and their interactions among them.
The scope of this article is to help you build a fully distributed kubernetes platform all by yourself, to have it at your disposal on your own machine so that you can start playing with it and thereby, learning the platform better. This article doesn’t get into the basics of kubernetes platform per se. There are many articles out there online that do a fantastic job, which I am pointing them to, under References.
For now, I am focusing only on building the platform from scratch (you can stop right here if this is not of your interest :-)) Once I am done with that part, I am pointing to some good links/resources who have done a very good job in teaching how to run workloads with their YAML files and in the process, explaining all the features the platform as a whole, provides.

My physical setup is follows:
- I use Intel NUC running ESXi6 Hypervisor. This is where all the virtual machines that make up the Kubernetes platform run
- I physically connect my Intel NUC with my Macbook-Pro laptop with a crossover cable back-to-back
- I define a dedicated network between the two.
- I then built the entire Kubernetes platform on my NUC, there by accessing it from my Laptop


Once the Kubernetes platform is completely built, you will have multiple networks, each for a different purpose:
- 10.1.1.0/24 network – This is the network defined between my Macbook pro and my Intel NUC
- 172.16.10.0/24 network – This is the private network on which all the VMs that make up the kubernetes platform reside
- 10.20.0.0/16 network – This is the network created by flanneld which is an overlay network on top of (2)
- 10.20.xx.yy/24 network – This is the network that gets created among each docker running on each NODE so that the network address space is spread across multiple NODES. The most important thing to understand is that on each NODE where the docker runs, it gets a subnet assigned for itself from flanneld, which then uses that subnet range to assign the IP addresses for the Containers on its node (This will be clear in Section 4)
- 10.240.0.0/24 network – This is the Cluster lever network whose scope resides within the Cluster.
To have a distributed Kubernetes platform, I built a dozen virtual machines in total. Apart from EDGE VM, rest of them are running CentOS7:
1 x EDGE VM running EFW distribution, configured as network gateway
1 x DNS VM – CentOS7 VM running FreeIPA for DNS service
1 x JUMPBOX VM – CentOS7 VM where you log in that has visibility to all the VMs
3 x ETCD VMs – Three CentOS7 VMs that run ETCD service, which is a distributed Key / Value store. This is where all the information about the Kubernetes platform is stored and shared among all the components
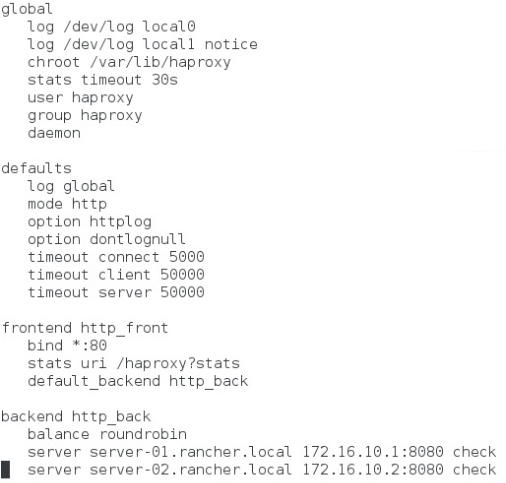
1 x MASTER VM – CentOS7 VM where kube-apiserver, kube-controller-manager, kube-scheduler, flannel (overlay networking) and docker will be running. It is worth noting that it is possible to architect the platform without running docker on the Master node. In a production system, it is recommended to have a secondary Master as well, and having a Load Balancer in the frontend. I will skip the secondary Master and Load Balancer for now and will try visiting at a later time
5 x NODE VMs – Five CentOS7 VMs where kubelet, kube-proxy, flanneld, docker will be installed. There are the Nodes where Kubernetes PODs will be running. Each POD holds one or more docker containers that run the workloads
On my Intel NUC running ESXi6 hypervisor, I created 2 standard switches – vSwitch0 (WAN) and vSwitch1 (LAN). Except for the EDGE VM which acts as a Gateway that saddles between vSwitch0 and vSwitch1, rest of the VMs are connected to vSwitch1, there by residing on a separate network (172.16.10.0/24)
Configuration of virtual machines are as follows:

I have broken down the steps in building the distributed Kubernetes platform into multiple sections:
- Configuration of ETCD VMs
- Configuration of JUMPBOX VM (specific to my setup)
- Configuration of the MASTER VM
- Configuration of NODES VMs
- Installation of Kubernetes Dashboard
- Running a simple NGINX server as a POD
- The real learning of Kubernetes platform starts now
Section 1. Configuration of ETCD VMs
I have seen articles that explain how to build ETCD distributed store as part of the Master VM. But here I am building the ETD as a separate cluster by itself, made up of 3 VMs (you can go up to 5 VMs). This way, the key /value store will be kept truly independent as how it should be in a production grade setup.
I started with the first VM of the ETCD cluster namely ETCD-01 VM. Except for its IP address, the steps are exactly the same for the other two ETCD VMs as well (ETCD-02 and ETCD-03).
To begin with, disable SELINUX by editing the file /etc/selinux/config followed by stopping/disabling firewall service, installing the packages open-vm-tools, net-tools and finally updating the entire system with yum update command.
ETCD-01# vi /etc/selinux/config
disable SELINUX
ETCD-01# setenforce 0
ETCD-01# systemctl stop firewalld.service
ETCD-01# systemctl disable firewalld.service
ETCD-01# yum -y install open-vm-tools net-tools
ETCD-01# yum -y update ; sync ; reboot
Create a user and group account named etcd under which the etcd service will be running
ETCD-01# mkdir /var/lib/etcd /etc/etcd
ETCD-01# groupadd -r etcd
ETCD-01# useradd –r -g etcd -d /var/lib/etcd -s /bin/nologin -c “etcd user” etcd
ETCD-01# chown -R etcd:etcd /var/lib/etcd
Create a service file for etcd so that it can be controlled by systemctl
ETCD-01# vi /usr/lib/systemd/system/etcd.service
-----
[Unit]
Description=etcd service
After=network.agent
[Service]
Type=notify
WorkingDirectory=/var/lib/etcd
EnvironmentFile=/etc/etcd/etcd.conf
User=etcd
ExecStart=/usr/bin/etcd
LimitNOFILE=65536
[Install]
WantedBy=multi.user.target
-----
Download and install ETCD software from github repository provided by CoreOS, by following the commands shown below:
ETCD-01# ETCD_VERSION=`curl -s -L https://github.com/coreos/etcd/releases/latest | grep linux-amd64\.tar\.gz | grep href | cut -f 6 -d '/' | sort -u`
ETCD-01# echo $ETCD_VERSION
ETCD-01# ETCD_DIR=/opt/etcd-$ETCD_VERSION
ETCD-01# echo $ETCD_DIR
ETCD-01# mkdir $ETCD_DIR
ETCD-01# curl -L https://github.com/coreos/etcd/releases/download/$ETCD_VERSION/etcd-$ETCD_VERSION-linux-amd64.tar.gz | tar xz --strip-components=1 -C $ETCD_DIR
ETCD-01# ln -sf $ETCD_DIR/etcd /usr/bin/etcd && ln -sf $ETCD_DIR/etcdctl /usr/bin/etcdctl
ETCD-01# etcdctl –version
etcdctl version: 3.2.1
API version: 2

Edit the file /etc/etcd/etcd.conf and define the required environment variables according to its IP address. Leave the default port numbers. The IP address of the VM ETCD-01 is 172.16.10.21
Also note that the IP addresses of VMs namely ETCD-02 (172.16.10.22) and ETCD-03 (172.16.10.23) are defined for the environment variable ETCD_INITIAL_CLUSTER
ETCD-01# vi /etc/etcd/etcd.conf
-----
# [member]
ETCD_NAME=etcd-01
ETCD_DATA_DIR="/var/lib/etcd/etcd-01.etcd"
ETCD_LISTEN_PEER_URLS="http://172.16.10.21:2380”
ETCD_LISTEN_CLIENT_URLS="http://172.16.10.21:2379”
ETCD_ADVERTISE_CLIENT_URLS="http://172.16.10.21:2379”
# [cluster]
ETCD_INITIAL_ADVERTISE_PEER_URLS="http://172.16.10.21:2380”
ETCD_INITIAL_CLUSTER="default="etcd-01=http://172.16.10.21:2380,etcd-02=http://172.16.10.22:2380,etcd-03=http://172.16.10.23:2380”
ETCD_INITIAL_CLUSTER_STATE="new"
ETCD_INITIAL_CLUSTER_TOKEN="etcd-cluster-01"
-----
Now that the configuration is done on ETCD-01 VM, enable and start the ETCD distributed key/value store service with the following commands:
ETCD-01# systemctl enable etcd.service
ETCD-01# systemctl start etcd.service
ETCD-01# systemctl status -l etcd.service
Finally, repeat the above commands in the other two VMs as well that are meant for ETCD cluster namely ETCD-02 (172.16.10.22) and ETCD-03 (172.16.10.23) with their appropriate IP addresses in their /etc/etcd/etcd.conf file
Section 2: Configuration of JUMPBOX VM
This section is specific to the way I design this lab. Since JUMPBOX VM is my primary VM where I will be working for the most part, I have created an user account named student and I am setting that user account’s environment in a way, I can manage both ETCD distributed store and Kubernetes platform remotely, from this JUMPBOX VM. Following are the list of things I am doing on JUMPBOX VM:
- As root, copy the command etcdctl from any of the ETCD VMs into /usr/local/bin directory
- As root, download kubectl command from kubernetes repository and place it in /usr/local/bin directory
- Make changes to the file .bashrc in home directory (of user account – student)
- Make a specific entry in the ETCD distributed store which is needed later for flanneld in creating the overlay network
Do the following as root:
JUMPBOX# cd /usr/local/bin
JUMPBOX# scp root@172.16.10.21:/opt/etcd-v3.2.1/etcdctl .
JUMPBOX# chmod +x ./etcdctl
JUMPBOX# curl -LO https://storage.googleapis.com/kubernetes-release/release/$(curl -s https://storage.googleapis.com/kubernetes-release/release/stable.txt)/bin/linux/amd64/kubectl
JUMPBOX# chmod +x ./kubectl
Do the following as user - student on JUMPBOX. It is this account I use when I log into JUMPBOX (than using root account)
JUMPBOX$ hostname
jumpbox.kuber.local
JUMPBOX$ whoami
student
JUMPBOX$ pwd
/home/student
JUMPBOX$ vi .bashrc
-----
export ETCD_CTLAPI=3
export ENDPOINTS="http://172.16.10.21:2379,http://172.16.10.22:2379,http://172.16.10.23:2379"
alias etcdctl="etcdctl --endpoints=$ENDPOINTS "
alias kubectl=”kubectl --server=172.16.10.1:8080”
-----
Note that I am making a reference to the MASTER-VM (172.16.10.1) though I haven’t configured it yet. I will be doing that at a later stage. For now continuing as the user student
JUMPBOX$ . .bashrc
JUMPBOX$ etcdctl –version
etcdctl version: 3.2.1
API version: 2
Checking the health of the ETCD distributed store
JUMPBOX$ etcdctl cluster-health

The above output confirm that the ETCD is configured correctly and is up and running.
Next, the command below makes an entry in the ETCD distributed store. The IP address, subnet mask, port number all makes sense at a later stage when configuring flanneld
JUMPBOX$ etcdctl mk /overlay/network/config "{\"Network\": \"10.20.0.0/16\", \"SubnetLen\": 24, \"Backend\": { \"Type\": \"udp\", \"Port\": 7890 } }"
Verify that the entry was done right by retrieving it:
JUMPBOX$ etcdctl get overlay/network/config

Verify the same with curl command as well:
JUMPBOX$ curl -L http://172.16.10.21:2379/v2/keys/overlay/network/config

Section 3: Configuration of MASTER-01 VM
The following components needs to be installed and configured on MASTER-01 VM:
- kube-apiserver
- kube-controller-manager
- kube-scheduler
- flanneld
- docker
I have recreated the diagram showing the components running in the MASTER-01 VM, and their interactions with other components with other systems (Author: Edward Viaene)

To begin with, define the required repository first MASTER-01# vi /etc/yum.repos.d/virt7-docker-common-release.repo
-----
[virt7-docker-common-release]
name=virt7-docker-common-release
baseurl=http://cbs.centos.org/repos/virt7-docker-common-release/x86_64/os/
gpgcheck=0
-----
Installing Kubernetes and flannel packages will install docker and their dependencies as well.
MASTER-01# yum -y install --enablerepo=virt7-docker-common-release kubernetes flannel
Modify the file /etc/kubernetes/config to define the environment variables regarding ETCD Cluster and MASTER-VM
MASTER-01# vi /etc/kubernetes/config
-----
KUBE_ETCD_SERVERS="--etcd-servers=http://172.16.10.21:2379,http://172.16.10.22:2379,http://172.16.10.23:2379"
KUBE_LOGTOSTDERR="--logtostderr=true"
KUBE_LOG_LEVEL="--v=0"
KUBE_ALLOW_PRIV="--allow-privileged=false"
KUBE_MASTER="--master=http://172.16.10.1:8080"
-----
Down the following shell script from the net. Make some modifications and then run it, which will generate the required certificates and place them in the required directory – /srv/kubernetes
Copy the contents of file to /root in MASTER-01 VM.
https://github.com/kubernetes/kubernetes/blob/master/cluster/saltbase/salt/generate-cert/make-ca-cert.sh
EDIT line# 30 of make-ca-cert.sh
Change the value of the variable cert_group=${CERT_GROUP:-kube-cert}
Remove the “-cert” at the end.
MASTER-01# vi /root/make-ca-cert.sh
-----
cert_group=${CERT_GROUP:-kube}
-----
Now run that shell script
MASTER-01# bash /root/make-ca-cert.sh
The directory /srv/kubernetes will have the generated certificates
MASTER-01#ls /srv/kubernetes

Define kube-apiserver requirements by modifying the file /etc/kubernetes/apiserver
MASTER-01# vi /etc/kubernetes/apiserver
-----
KUBE_API_ADDRESS="--address=172.16.10.1"
KUBE_API_PORT="--port=8080"
KUBELET_PORT="--kubelet-port=10250"
KUBE_SERVICE_ADDRESSES="--service-cluster-ip-range=10.254.0.0/16"
KUBE_ADMISSION_CONTROL="--admission-control=NamespaceLifecycle,NamespaceExists,LimitRanger,SecurityContextDeny,ServiceAccount,ResourceQuota"
KUBE_API_ARGS” --client-ca-file=/srv/kubernetes/ca.crt --tls-cert-file=/srv/kubernetes/server.cert --tls-private-key-file=/srv/kubernetes/server.key"
-----
Define kube-controller-manager requirements by modifying the file /etc/kubernetes/controller-manager
MASTER-01# vi /etc/kubernetes/controller-manager
-----
# Add your own!
KUBE_CONTROLLER_MANAGER_ARGS="--root-ca-file=/srv/kubernetes/ca.crt --service-account-private-key-file=/srv/kubernetes/server.key"
-----
Define flannel requirements by modifying the file /etc/sysconfig/flannel
MASTER-01# vi /etc/sysconfig/flannel
-----
FLANNEL_ETCD="http://172.16.10.21:2379,http://172.16.10.22:2379,http://172.16.10.23:2379"
FLANNEL_ETCD_PREFIX="/overlay/network/config"
-----
If you recall, /overlay/network/config is exactly what we added into the ETCD distributed store in Section 2. And it is that network address space (10.20.0.0/16) that will be used by flannel, which then creates subnets and assigns to each docker running on different NODE VM. Again, I would strongly recommend Peng Xiao’s website for a thorough explanation and better understanding.
Now that all the requirements are met, enable and start each server in the following order:
MASTER-01# systemctl enable kube-apiserver
MASTER-01# systemctl start kube-apiserver
MASTER-01# systemctl status -l kube-apiserver
MASTER-01# systemctl enable kube-controller-manager
MASTER-01# systemctl start kube-controller-manager
MASTER-01# systemctl status -l kube-controller-manager
MASTER-01# systemctl start kube-scheduler
MASTER-01# systemctl start kube-scheduler
MASTER-01# systemctl status -l kube-scheduler
MASTER-01# systemctl enable flanneld
MASTER-01# systemctl start flanneld
MASTER-01# systemctl status -l flanneld
MASTER-01: systemctl restart docker
MASTER-01# systemctl status -l docker
Section 4: Configuration of NODE-01 VM
There are total of 5 NODE VMs in my setup. These are the VMs that will eventually run the PODS/docker containers/application workloads.
The following components will be installed and configured on all five NODE VMs:
- kubelet
- kube-proxy
- flanneld
- docker
Again, I have recreated the diagram that shows the components running in NODE VMs and their interactions with other components

The setup shown below is to the context of NODE-01 VM. Except for the IP address, everything else is pretty much the same that needs to be repeated on the other 4 NODE VMs. Define the repository first
NODE-01# vi /etc/yum.repos.d/virt7-docker-common-release.repo
-----
[virt7-docker-common-release]
name=virt7-docker-common-release
baseurl=http://cbs.centos.org/repos/virt7-docker-common-release/x86_64/os/
gpgcheck=0
-----
Install the required packages and their dependencies
NODE-01# yum -y install --enablerepo=virt7-docker-common-release kubernetes flannel
[Note: Docker will also be installed as part of the dependency and it will also be started by default]
Start with the configuration about the MASTER-01 VM by editing the file /etc/kubernetes/config
NODE-01# vi /etc/kubernetes/config
-----
KUBE_LOGTOSTDERR="--logtostderr=true"
KUBE_LOG_LEVEL="--v=0"
KUBE_ALLOW_PRIV="--allow-privileged=false"
KUBE_MASTER="--master=http://172.16.10.1:8080"
-----
Define kubelet requirements in the file /etc/kubernetes/kubelet
NODE-01# vi /etc/kubernetes/kubelet
-----
KUBELET_ADDRESS="--address=172.16.10.51"
KUBELET_PORT="--port=10250"
KUBELET_HOSTNAME="--hostname-override=node-01.kuber.local"
KUBELET_API_SERVER="--api-servers=http://172.16.10.1:8080"
KUBELET_ARGS=”--cluster-dns=172.16.10.250 --cluster-domain=kuber.local”
-----
Define flannel requirements in the file /etc/sysconfig/flanneld
NODE-01# vi /etc/sysconfig/flanneld
-----
FLANNEL_ETCD="http://172.16.10.21:2379,http://172.16.10.22:2379,http://172.16.10.23:2379"
FLANNEL_ETCD_PREFIX="/overlay/network"
-----
Now that all the configurations are done, enable and start the services
NODE-01# systemctl enable kube-proxy
NODE-01# systemctl start kube-proxy
NODE-01# systemctl status –l kube-proxy
NODE-01# systemctl enable kubelet
NODE-01# systemctl start kubelet
NODE-01# systemctl status –l kubelet
NODE-01# systemctl enable flannel
NODE-01# systemctl start flannel
NODE-01# systemctl status –l flannel
The following files will created once flanneld gets started
/run/flannel/subnet.env
/run/flannel/docker
NODE-01# cat /run/flannel/subnet.env
-----
FLANNEL_NETWORK=10.20.0.0/16
FLANNEL_SUBNET=10.20.18.1/24
FLANNEL_MTU=1472
FLANNEL_IPMASQ=false
-----
NODE-01# cat /run/flannel/docker
-----
DOCKER_OPT_BIP=”--bip=10.20.18.1/24”
DOCKER_OPT_IPMASQ=”--ip-masq=true”
DOCKER_OPT_MTU=”--mtu=1472”
DOCKER_NETWORK_OPTIONS=”--bip=10.20.18.1/24 --ip-masq=true --mtu=1472”
-----
Note that the above IP address for docker (10.20.18.1/24) is obtained from the subnet range provided by flanneld service, which in turn gets it from the ETCD service where 10.20.0.0/16 network address space was already defined by us before (in Section 2). Flanneld refers ETCD service in taking care of assigning different subnet ranges to different docker(s) running on different NODES.
Initially when you run ‘ifconfig’ command, you will notice that docker0 (linux bridge) will be assigned a different IP address, when the docker package was installed and docker daemon was started the first time.
NODE-01# ifconfig

But once you restart the docker service after starting flanneld, you will now notice that it will consume the very first IP address from the flanneld assigned subnet address range (10.20.X), and no longer uses 172.17.X network.
NODE-01# systemctl restart docker
NODE-01# systemctl status –l docker
NODE-01# ifconfig

Docker will use the very first IP address from the flanneld’s subnet (docker0 = 10.20.18.1/24). From here onwards, all the Containers will be auto assigned from this network address space where Docker (10.20.18.1 in my case) will be their Gateway.
This is probably a good place make a pause, take a step back, try to assimilate all the details in understanding the mechanics of how overlay networking is being done by flanneld.
I would strongly recommend Peng Xiao’s website (References section) who has done an excellent job in explaining the networking fundamentals needed for Kubernetes platform.
To verify NODE-01 VM is talking to MASTER-01 and all the communications are happening as expected, go to JUMPBOX and issue the following command:
JUMPBOX$ kubectl get nodes –o wide

Section 5: Installation of Kubernetes dashboard
I have to admit that by the time I reached this far, I desperately wanted to see how Kubernetes dashboard UI is going to show up. So without debugging the errors messages that I faced, I just passed the parameter “--validate=false” to suppress them so that I can get on with the dashboard UI (I know I am cheating here)
JUMPBOX$ kubectl create -f https://git.io/kube-dashboard --validate=false
But I believe the right way to do is:
JUMPBOX$ kubectl create -f https://rawgit.com/kubernetes/dashboard/master/src/deploy/kubernetes-dashboard.yaml
If a password is asked, I believe you can retrieve the password with:
JUMPBOX$ kubectl config view
Verify the deployment of the dashboard POD as well
JUMPBOX$ kubectl get pods –all-namespaces
And finally, from JUMPBOX VM you should be able to see Kubernetes dashboard UI at :
http://master-01.kuber.local:8080/ui

Section 6: Installing NGINX POD
Follow the link below to run your very first pod. From now on, you can run all the commands from JUMPBOX VM.
https://github.com/kubernetes/kubernetes/blob/master/examples/simple-nginx.md
Section 7: The learning curve start here
If you have come this far, you’ll realize that what we have done so far is just the beginning J Next, we need to learn how to use, consume and administer the platform, for which I have a couple of suggestions:
Download the lab exercises provided by Edward Viaene and Peng Xiao and follow their documentation:
https://github.com/wardviaene/kubernetes-course
https://github.com/xiaopeng163/docker-k8s-lab
And if you really want to accelerate the learning process, I would recommend you to take these two courses. They go hand-on-hand with the above links.
https://www.udemy.com/learn-devops-the-complete-kubernetes-course/
https://www.udemy.com/learning-docker-and-k8s-by-practice/
Now that you have your own Kubernetes platform at you disposal running on your own server, having the lab exercises and video lessons will certainly save you a lot of time and keep you stay focused with you learning.
Needless you say, wishing you the very best!
Section 8: References
http://docker-k8s-lab.readthedocs.io/en/latest/
http://www.tothenew.com/blog/how-to-install-kubernetes-on-centos/
https://severalnines.com/blog/installing-kubernetes-cluster-minions-centos7-manage-pods-services
https://www.vultr.com/docs/getting-started-with-kubernetes-on-centos-7