Skip to content
  • HOME
  • About Us
    • Our Mission
    • Our Paradigm
    • Who we are
  • Our IP
    • Hands-On Box™
    • Inception
    • Evolution
    • Design & Build
    • Ongoing Progress
  • Articles
    • Installing Hyperledger
    • Disaster Recovery Orchestration
    • Building Distributed SUSE CaaS Platform 2.0
    • Building Distributed Kubernetes from scratch
    • Building Enterprise-Grade Kubernetes with Rancher Labs
    • Building Kubernetes with VMWare Photon 1.2
    • From C to C# minor
    • Installing RockyLinux8 on Rockpi4c
    • Swami ARMananda Theorem
    • Tanzu Community Edition on RockpiX
    • StudentOS
    • Harbor Registry on Raspberry Pi4
    • Nextcloud on Raspberry Pi4
    • Shellinabox on Raspberry Pi4
    • Official port of Harbor Registry on ARM
    • Armbian on Radxa’s Rock5b
  • Blogs
    • incus OVN setup
Cloud on the Ground ™

self-directed learning paradigm™

(a disruptive and innovative platform to master IT at your own pace, in your own time, in your own language and on your own homelab server - patent pending)
https://fieldday.io/wp-content/uploads/2017/01/Self-directed_learning_platform.mp4
Copyright © 2025 FieldDay.io - All rights reserved
All Product names, logos, brands and trademarks are property of respective owners
72 Parental Scales (Melakarta Ragas)

section 01: configuring web server on JUMPBOX


Log into JUMPBOX VM (172.16.10.10) and configure it as a repository by running the following commands as root.

# yum install –y open-vm-tools net-tools wget bridge-utils tftp tftp-server \
     dhcp httpd php gd php-gd syslinux epel-release

# vi /etc/selinux/config
-----
SELINUX=disabled
-----

# systemctl stop firewalld.service
# systemctl disable firewalld.service
# yum –y update ; sync ; sync ; reboot
  • Download SUSE CaaSP 2.0 Platform from SUSE web site
  • Upload the iso image to local Datastore
  • Connect it to CDROM of JUMPBOX VM
  • Power on the VM
  • I logged in as a regular user (named ‘student’) and then ran ‘su – root’
# cd /var/www/html
# mkdir -p repository/DVD1
# mkdir info-files
# cd repository/DVD1
# cp -rav /run/media/student/SUSE-CaaS-Platform-2.0-DVD-86_6/* ./repository/DVD1
# chmod -R 755 *
# chown -R apache:apache *
  • Create a file to define an alias for /repository.
  • The filename can be anything, as long as it it located in directory /etc/httpd/conf.d
# vi /etc/httpd/conf.d/pxeboot.conf
----- 
Alias /repository /var/www/html/repository
<Directory /var/www/html/repository>
       Options Indexes FollowSymLinks
       Allow from all
</Directory>
----- 
  • Modify httpd.conf
# vi /etc/httpd/conf/httpd.conf
----- 
Listen 172.16.10.10:80
ServerName jumpbox.susecaas.local:80
-----
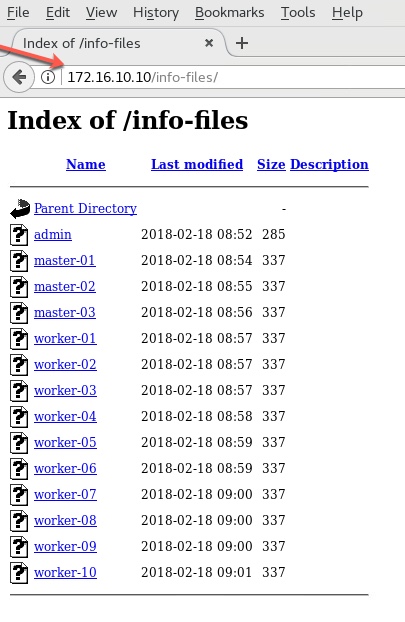
  • Define ‘info-files’ for each virtual machine, starting with ADMIN (node) VM
# cd /var/www/html/info-files
# vi admin
----- 
netdevice=eth0
ifcfg="eth0=172.16.10.50/24,172.16.10.253,172.16.10.250,susecaas.local"
hostip=172.16.10.50/24
netmask=255.255.255.0
gateway=172.16.10.253
nameserver=172.16.10.250
domain=susecaas.local
hostname=admin.susecaas.local
install=http://jumpbox.susecaas.local/repository/DVD1
----- 
  • Define info-file for MASTER-01 VM
# vi master-01 
-----  
netdevice=eth0 ifcfg="eth0=172.16.10.101/24,172.16.10.253,172.16.10.250,susecaas.local" 
hostip=172.16.10.101/24
netmask=255.255.255.0
gateway=172.16.10.253
nameserver=172.16.10.250
domain=susecaas.local
hostname=master-01.susecaas.local
install=http://jumpbox.susecaas.local/repository/DVD1
autoyast=http://admin.susecaas.local/autoyast
-----
  • Define info-file for MASTER-02 VM
# vi master-02 
-----  
netdevice=eth0 ifcfg="eth0=172.16.10.102/24, 172.16.10.253, 172.16.10.250,susecaas.local" 
hostip=172.16.10.102/24
netmask=255.255.255.0
gateway=172.16.10.253
nameserver=172.16.10.250
domain=susecaas.local
hostname=master-02.susecaas.local
install=http://jumpbox.susecaas.local/repository/DVD1
autoyast=http://admin.susecaas.local/autoyast
-----
  • Define info-file for MASTER-03 VM
# vi master-03 
-----  
netdevice=eth0 ifcfg="eth0=172.16.10.103/24,172.16.10.253,172.16.10.250,susecaas.local" 
hostip=172.16.10.103/24
netmask=255.255.255.0
gateway=172.16.10.253
nameserver=172.16.10.250
domain=susecaas.local
hostname=master-03.susecaas.local
install=http://jumpbox.susecaas.local/repository/DVD1
autoyast=http://admin.susecaas.local/autoyast
----
  • Define info-file for WORKER-01 VM
# vi worker-01 
-----  
netdevice=eth0 ifcfg="eth0=172.16.10.201/24,172.16.10.253,172.16.10.250,susecaas.local" 
hostip=172.16.10.201/24
netmask=255.255.255.0
gateway=172.16.10.253
nameserver=172.16.10.250
domain=susecaas.local
hostname=worker-01.susecaas.local
install=http://jumpbox.susecaas.local/repository/DVD1
autoyast=http://admin.susecaas.local/autoyast
----
  • Define info-file for WORKER-02 VM
# vi worker-02 
-----  
netdevice=eth0 ifcfg="eth0=172.16.10.202/24,172.16.10.253,172.16.10.250,susecaas.local" 
hostip=172.16.10.202/24
netmask=255.255.255.0
gateway=172.16.10.253
nameserver=172.16.10.250
domain=susecaas.local
hostname=worker-02.susecaas.local
install=http://jumpbox.susecaas.local/repository/DVD1
autoyast=http://admin.susecaas.local/autoyast
----
  • Define info-file for WORKER-03 VM
# vi worker-03 
-----  
netdevice=eth0 ifcfg="eth0=172.16.10.203/24,172.16.10.253,172.16.10.250,susecaas.local" 
hostip=172.16.10.203/24
netmask=255.255.255.0
gateway=172.16.10.253
nameserver=172.16.10.250
domain=susecaas.local
hostname=worker-03.susecaas.local
install=http://jumpbox.susecaas.local/repository/DVD1
autoyast=http://admin.susecaas.local/autoyast
----
  • Define info-file for WORKER-04 VM
# vi worker-04 
-----  
netdevice=eth0 ifcfg="eth0=172.16.10.204/24,172.16.10.253,172.16.10.250,susecaas.local" 
hostip=172.16.10.204/24
netmask=255.255.255.0
gateway=172.16.10.253
nameserver=172.16.10.250
domain=susecaas.local
hostname=worker-04.susecaas.local
install=http://jumpbox.susecaas.local/repository/DVD1
autoyast=http://admin.susecaas.local/autoyast
----
  • Define info-file for WORKER-05 VM
# vi worker-05 
-----  
netdevice=eth0 ifcfg="eth0=172.16.10.205/24,172.16.10.253,172.16.10.250,susecaas.local" 
hostip=172.16.10.205/24
netmask=255.255.255.0
gateway=172.16.10.253
nameserver=172.16.10.250
domain=susecaas.local
hostname=worker-05.susecaas.local
install=http://jumpbox.susecaas.local/repository/DVD1
autoyast=http://admin.susecaas.local/autoyast
----
  • Define info-file for WORKER-06 VM
# vi worker-06 
-----  
netdevice=eth0 ifcfg="eth0=172.16.10.206/24,172.16.10.253,172.16.10.250,susecaas.local" 
hostip=172.16.10.206/24
netmask=255.255.255.0
gateway=172.16.10.253
nameserver=172.16.10.250
domain=susecaas.local
hostname=worker-06.susecaas.local
install=http://jumpbox.susecaas.local/repository/DVD1
autoyast=http://admin.susecaas.local/autoyast
----
  • Define info-file for WORKER-07 VM
# vi worker-07 
-----  
netdevice=eth0 ifcfg="eth0=172.16.10.207/24,172.16.10.253,172.16.10.250,susecaas.local" 
hostip=172.16.10.207/24
netmask=255.255.255.0
gateway=172.16.10.253
nameserver=172.16.10.250
domain=susecaas.local
hostname=worker-07.susecaas.local
install=http://jumpbox.susecaas.local/repository/DVD1
autoyast=http://admin.susecaas.local/autoyast
----
  • Define info-file for WORKER-08 VM
# vi worker-08 
-----  
netdevice=eth0 ifcfg="eth0=172.16.10.208/24,172.16.10.253,172.16.10.250,susecaas.local" 
hostip=172.16.10.208/24
netmask=255.255.255.0
gateway=172.16.10.253
nameserver=172.16.10.250
domain=susecaas.local
hostname=worker-08.susecaas.local
install=http://jumpbox.susecaas.local/repository/DVD1
autoyast=http://admin.susecaas.local/autoyast
----
  • Define info-file for WORKER-09 VM
# vi worker-09 
-----  
netdevice=eth0 ifcfg="eth0=172.16.10.209/24,172.16.10.253,172.16.10.250,susecaas.local" 
hostip=172.16.10.209/24
netmask=255.255.255.0
gateway=172.16.10.253
nameserver=172.16.10.250
domain=susecaas.local
hostname=worker-09.susecaas.local
install=http://jumpbox.susecaas.local/repository/DVD1
autoyast=http://admin.susecaas.local/autoyast
----
  • Define info-file for WORKER-10 VM
# vi worker-10 
-----  
netdevice=eth0 ifcfg="eth0=172.16.10.210/24,172.16.10.253,172.16.10.250,susecaas.local" 
hostip=172.16.10.210/24
netmask=255.255.255.0
gateway=172.16.10.253
nameserver=172.16.10.250
domain=susecaas.local
hostname=worker-10.susecaas.local
install=http://jumpbox.susecaas.local/repository/DVD1
autoyast=http://admin.susecaas.local/autoyast
-----
  • Charge ownership of all info-files to the web server
# pwd
  /var/www/html/info-files
# chmod 755 *
# chown apache:apache *
  • Start the web server
# systemctl start httpd.service
# systemctl enable httpd.service
# systemctl status -l httpd.service

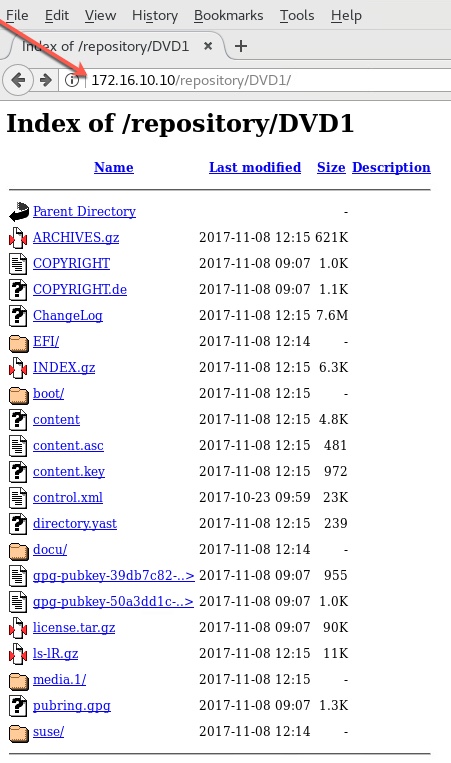
Now open up the browser in the JUMPBOX VM itself and verify that the files in directories namely

/var/www/html/repository/DVD1 and /var/www/html/info-files are accessible from the browser.

This confirm that the website is now completed successfully as a repository.

section 02: configuring tftp server on JUMPBOX
# hostname
  jumpbox.susecaas.local

# rpm -ivh http://jumpbox.susecaas.local/repository/DVD1/suse/noarch/tftpboot-installation-CAASP-2.0-x86_64-14.320-1.35.noarch.rpm

# cd /srv
# chmod 755 tftpboot
# cd CAASP-2.0-x86_64/net
# cp /usr/share/syslinux/menu.c32 .
# cp /usr/share/syslinux/memdisk .
# cp /usr/share/syslinux/mboot.c32 .
# cp /usr/share/syslinux/chain.32 .
# ls -l

# cd pxelinux.cfg
# mv default default.orig ; cp default.orig default

# vi default
-----
default menu.c32
MENU TITLE SUSE-CaaS Platform 2.0 Custom Installer – FieldDay.io
NOHALT 1
PROMPT 0
TIMEOUT 140

LABEL CAASP-ADMIN
   MENU LABEL CAASP-ADMIN (172.16.10.50)
   ipappend 2
   kernel boot/x86_64/loader/linux
   append ksdevice=bootif initrd=boot/x86_64/loader/initrd info=http://jumpbox.susecaas.local/info-files/admin splash=silent

LABEL MASTER-01
   MENU LABEL MASTER-01 (172.16.10.101)
   ipappend 2
   kernel boot/x86_64/loader/linux
   append ksdevice=bootif initrd=boot/x86_64/loader/initrd info=http://jumpbox.susecaas.local/info-files/master-01 splash=silent

LABEL MASTER-02
   MENU LABEL MASTER-02 (172.16.10.102)
   ipappend 2
   kernel boot/x86_64/loader/linux
   append ksdevice=bootif initrd=boot/x86_64/loader/initrd info=http://jumpbox.susecaas.local/info-files/master-02 splash=silent

LABEL MASTER-03
   MENU LABEL MASTER-03 (172.16.10.103)
   ipappend 2
   kernel boot/x86_64/loader/linux
   append ksdevice=bootif initrd=boot/x86_64/loader/initrd info=http://jumpbox.susecaas.local/info-files/master-03 splash=silent

LABEL WORKER-01
   MENU LABEL WORKER-01 (172.16.10.201)
   ipappend 2
   kernel boot/x86_64/loader/linux
   append ksdevice=bootif initrd=boot/x86_64/loader/initrd info=http://jumpbox.susecaas.local/info-files/worker-01 splash=silent

LABEL WORKER-02
   MENU LABEL WORKER-02 (172.16.10.202)
   ipappend 2
   kernel boot/x86_64/loader/linux
   append ksdevice=bootif initrd=boot/x86_64/loader/initrd info=http://jumpbox.susecaas.local/info-files/worker-02 splash=silent

LABEL WORKER-03
   MENU LABEL WORKER-01 (172.16.10.203)
   ipappend 2
   kernel boot/x86_64/loader/linux
   append ksdevice=bootif initrd=boot/x86_64/loader/initrd info=http://jumpbox.susecaas.local/info-files/worker-03 splash=silent

LABEL WORKER-04
   MENU LABEL WORKER-01 (172.16.10.204)
   ipappend 2
   kernel boot/x86_64/loader/linux
   append ksdevice=bootif initrd=boot/x86_64/loader/initrd info=http://jumpbox.susecaas.local/info-files/worker-04 splash=silent

LABEL WORKER-05
   MENU LABEL WORKER-01 (172.16.10.205)
   ipappend 2
   kernel boot/x86_64/loader/linux
   append ksdevice=bootif initrd=boot/x86_64/loader/initrd info=http://jumpbox.susecaas.local/info-files/worker-05 splash=silent

LABEL WORKER-06
   MENU LABEL WORKER-01 (172.16.10.206)
   ipappend 2
   kernel boot/x86_64/loader/linux
   append ksdevice=bootif initrd=boot/x86_64/loader/initrd info=http://jumpbox.susecaas.local/info-files/worker-06 splash=silent

LABEL WORKER-07
   MENU LABEL WORKER-02 (172.16.10.207)
   ipappend 2
   kernel boot/x86_64/loader/linux
   append ksdevice=bootif initrd=boot/x86_64/loader/initrd info=http://jumpbox.susecaas.local/info-files/worker-07 splash=silent

LABEL WORKER-08
   MENU LABEL WORKER-01 (172.16.10.208)
   ipappend 2
   kernel boot/x86_64/loader/linux
   append ksdevice=bootif initrd=boot/x86_64/loader/initrd info=http://jumpbox.susecaas.local/info-files/worker-08 splash=silent

LABEL WORKER-09
   MENU LABEL WORKER-01 (172.16.10.209)
   ipappend 2
   kernel boot/x86_64/loader/linux
   append ksdevice=bootif initrd=boot/x86_64/loader/initrd info=http://jumpbox.susecaas.local/info-files/worker-09 splash=silent

LABEL WORKER-10
   MENU LABEL WORKER-01 (172.16.10.210)
   ipappend 2
   kernel boot/x86_64/loader/linux
   append ksdevice=bootif initrd=boot/x86_64/loader/initrd info=http://jumpbox.susecaas.local/info-files/worker-10 splash=silent
-----

# vi /usr/lib/systemd/system/tftp.service
-----
ExecStart=/usr/sbin/in.tftpd –s /srv/tftpboot/CAASP-2.0-x86_64
-----
  • Start TFTP socker server
# systemctl enable tftp.socket
# systemctl start tftp.socket
# systemctl status –l tftp.socket
  • Start TFTP server
# systemctl enable tftp.service
# systemctl start tftp.service
# systemctl status –l tftp.service
  • Make an entry in crontab file to restart TFTP server
# crontab –e
-----
@reboot systemctl start tftp.service
-----
# crontab –l
# sync ; reboot
  • After reboot, make sure TFTP service is running fine without manually starting the service
# systemctl status –l tftp.service
section 03: configuring dhcp server on JUMPBOX
#hostname
 jumpbox.susecaas.local

# vi /etc/dhcp/dhcpd.conf
--
allow booting;
allow bootp;
class "pxeclients" {
 match if substring (option vendor-class-identifier, 0, 9) = "PXEClient";
 next-server 172.16.10.10;
 filename = "net/pxelinux.0";
}
# No service will be given on this subnet, but declaring it helps the
# DHCP server to understand the network topology.
# This will disable dole'ing out DHCP address to virtual bridge virbr0
subnet 192.168.122.0 netmask 255.255.255.0 {
}
subnet 172.16.10.0 netmask 255.255.255.0 {
 authoritative;
 range 172.16.10.230 172.16.10.248;
 default-lease-time 900;
 max-lease-time 1200;
 option routers 172.16.10.253;
 option subnet-mask 255.255.255.0;
 option broadcast-address 172.16.10.255;
 option domain-name-servers 172.16.10.250, 8.8.8.8;
 option domain-name "susecaas.local";
}
--

# systemctl enable dhcpd.service
# systemctl start dhcpd.service
# systemctl status -l dhcpd.service
section 01: web server (english)

section 01: web server (tamil)

section 02: tftp server (english)

section 02: tftp server (tamil)

section 03: dhcp server (english)

section 03: dhcp server (tamil)

section 04: PXE Admin (english)

section 04: PXE Admin (tamil)

section 05: config Admin (english)

section 05: config Admin (tamil)

section 06: PXE Masters (english)

section 06: PXE Masters (tamil)

section 07: PXE Workers (english)

section 07: PXE Workers (tamil)

config 08: config 3 Masters, 2 Workers (english)

section 08: config 3 Masters, 2 Workers (tamil)

section 09: config 8 more Workers (english)

section 09: config 8 more Workers (tamil)

section 10: testing with kubectl (english)

section 10: testing with kubectl (tamil)

Introduction

Configuration of DNS Server


Login as root in DNS Server VM (172.16.10.250) and enter the following commands:

# yum install -y open-vm-tools net-tools wget

# yum install -y gcc

// Disable the firewall

# systemctl stop firewalld.service

# systemctl disable firewalld.service

// Disable selinux

# vi /etc/selinux/config

# setenforce 0

// Yum update and reboot

# yum -y update; sync; reboot

// DNS service installation

// Pre-req for DNS installation

# yum install –y epel-release.noarch

# yum install –y haveged

# systemctl enable haveged.service

# systemctl start haveged.service

// DNS install

# yum -y install ipa-server bind bind-utils bind-dyndb-ldap ipa-server-dnssync  ipa-server-dns

# sync; reboot

# ipa-server-install —setup-dns
Directory Manager password : 1FieldDay-IO    // Enter your preferred password of choice
IPA admin password: 1FieldDay-IO

Please provide the IP address to be user for this host name: 172.16.10.250
# kinit admin // initialize admin account
Password for admin@ : 1FieldDay-IO 
Configuring HAProxy Load Balancer


Log into LB VM (172.16.10.100) and run the following commands as root. Note that the VMs SERVER-01 and SERVER-02 are defined as backend in the file /etc/haproxy/haproxy.cfg


# yum install –y open-vm-tools net-tools wget bridge-utils

# vi /etc/selinux/config

-----

SELINUX=disabled

-----

# systemctl stop firewalld.service

# systemctl disable firewalld.service

# yum –y update ; sync ; sync ; reboot

# yum install –y gcc pcre-static pcre-devel 

# wget https://www.haproxy.org/download/1.7/src//haproxy-1.7.9.tar.gz -O ~/haproxy.tar.gz

# tar zxvf ~/haproxy.tar.gz –C ~/

# cd ~/haproxy-1.7.9

# make TARGET=linux2628

# make install

# make clean

# mkdir –p /etc/haproxy

# mkdir –p /var/lib/haproxy

# touch /var/lib/haproxy/stats

# ln –s /usr/local/sbin/haproxy /usr/sbin/haproxy

# cp ~/haproxy-1.7.9/examples/haproxy.init /etc/init.d/haproxy

# chmod 755 /etc/init.d/haproxy

# systemctl daemon-reload

# useradd –r haproxy

# haproxy –v
# vi /etc/haproxy/hproxy.cfg


# systemctl enable haproxy

# systemctl restart haproxy


Installation and Configuration of MYSQL Server


Login as root into MYSQL VM (172.16.10.14) and enter the following commands:


# yum install –y open-vm-tools net-tools tcpdump

# vi /etc/selinux/config

-----

SELINUX=disabled

-----

# systemctl stop firewalld.service

# systemctl disable firewalld.service

# yum –y update ; sync ; sync ; reboot

# rpm –import /etc/pki/rpm-gpg/RPM-GPG-KEY*

# yum –y install epel-release

# yum –y install mariadb-server mariadb

# systemctl start mariadb.service

# systemctl enable mariadb.service

# mysql_secure_installation

NOTE: RUNNING ALL PARTS OF THIS SCRIPT IS RECOMMENDED FOR ALL MariaDB
SERVERS IN PRODUCTION USE!  PLEASE READ EACH STEP CAREFULLY!

In order to log into MariaDB to secure it, we’ll need the current
password for the root user.  If you’ve just installed MariaDB, and
you haven’t set the root password yet, the password will be blank,
so you should just press enter here.

Enter current password for root (enter for none): <–Hit ENTER
OK, successfully used password, moving on…

Setting the root password ensures that nobody can log into the MariaDB
root user without the proper authorisation.

Set root password? [Y/n]
New password: 1FieldDay-IO                       // Enter your preferred password here
Re-enter new password: 1FieldDay-IO      // re-enter the password again
Password updated successfully!
Reloading privilege tables..
… Success!

By default, a MariaDB installation has an anonymous user, allowing anyone
to log into MariaDB without having to have a user account created for
them.  This is intended only for testing, and to make the installation
go a bit smoother.  You should remove them before moving into a
production environment.

Remove anonymous users? [Y/n] <–Hit ENTER
… Success!

Normally, root should only be allowed to connect from ‘localhost’.  This
ensures that someone cannot guess at the root password from the network.

Disallow root login remotely? [Y/n] <–Hit ENTER
… Success!

By default, MariaDB comes with a database named ‘test’ that anyone can
access.  This is also intended only for testing, and should be removed
before moving into a production environment.

Remove test database and access to it? [Y/n] <–Hit ENTER
– Dropping test database…
… Success!
– Removing privileges on test database…
… Success!

Reloading the privilege tables will ensure that all changes made so far
will take effect immediately.

Reload privilege tables now? [Y/n] <–Hit ENTER
… Success!

Cleaning up…

All done!  If you’ve completed all of the above steps, your MariaDB
installation should now be secure.

Thanks for using MariaDB!


// Install apache web server

# yum –y install httpd

# systemctl start httpd.service

# systemctl enable httpd.service


// Install PHP 7.1

# rpm –Uvh http://rpms.remirepo.net/enterprise/remi-release-7.rpm

# yum –y install yum-utils

# yum –y update

# yum-config-manager --enable remi-php71

# yum –y install php php-opcache

# systemctl restart httpd.service

# vi /var/www/html/info.php

-----

<?php

phpinfo();

?>

-----


From JUMPBOX, point your browser to http://172.16.10.14/info.php


// Note: MySQL will not be listed in the above output.

// Install MySQL support in PHP

# yum search php

# yum –y install php-mysql

# yum -y install php-gd php-ldap php-odbc php-pear php-xml php-xmlrpc php-mbstring php-soap curl curl-devel

# systemctl restart httpd.service

// Reload the info.php page again. MySQL will be listed this time

// Install phpMyAdmin

# yum –y install phpMyAdmin

# vi /etc/httpd/conf.d/phpMyAdmin.conf

—–

[…]
Alias /phpMyAdmin /usr/share/phpMyAdmin Alias /phpmyadmin /usr/share/phpMyAdmin <Directory /usr/share/phpMyAdmin/>
AddDefaultCharset UTF-8

<IfModule mod_authz_core.c>
# Apache 2.4
# <RequireAny>
# Require ip 127.0.0.1
# Require ip ::1
# </RequireAny>
Require all granted
</IfModule>
<IfModule !mod_authz_core.c>
# Apache 2.2
Order Deny,Allow
Deny from All
Allow from 127.0.0.1
Allow from ::1
</IfModule>
</Directory>

<Directory /usr/share/phpMyAdmin/>

Options none

AllowOverride Limit

Require all granted

</Directory>

[…]

—–

# vi /etc/phpMyAdmin/config.inc.php

-----

[...] $cfg['Servers'][$i]['auth_type']     = 'http';   // Authentication method (config, http or cookie based)? [...]

-----
# systemctl restart httpd.service

http://172.16.10.14/myphpadmin

Credentials

Login: root

Password: 1FieldDay-IO

  • Create a database ‘rancherdb’.
  • Grant permission to user ‘rancher-user’ with ‘rancher-pass’ as the password
  • Grant permission to access from hosts – localhost, MASTER-01 (172.16.10.1) and MASTER-02 (172.16.10.2)

Confirm the same via JUMPBOX browser via myphpadmin


Configure ETCD nodes to use NFS shared storage for backup


On virtual machines ETCD-01, ETCD-02 and ETCD-03 , login as root and run the following commands:


# yum install –y open-vm-tools net-tools bridge-utils nfs-utils wget

# vi /etc/selinux/config

-----

SELINUX=disabled

-----

# setenforce 0

# systemctl stop firewalld.service

# systemctl disable firewalld.servicr

# yum –y update ; sync ; sync ; reboot

# mkdir –p /var/etcd/backups

# mount –t nfs 172.16.10.13:/mnt/backup-volume-group/backup-volume-01/etcd-share/ /var/etcd/backups

# df –h 

// verify NFS mount is successful

# touch /var/etcd/backups/testing

# rm /var/etcd/backups/testing

# umount /var/etcd/backups

# vi /etc/fstab
-----

172.16.10.13:/mnt/backup-volume-group/backup-volume-01/etcd-share   /var/etcd/backups    nfs          defaults               0 0

-----

or

# echo “172.16.10.13:/mnt/backup-volume-group/backup-volume-01/etcd-share   /var/etcd/backups    nfs          defaults               0 0” >> /etc/fstab

# cat /etc/fstab

# yum install –y docker

# systemctl enable docker; 

# yum –y update ; sync ; reboot

# ifconfig –a

# systemctl status –l docker

# df -h
Installation of server components on SERVER-01 and SERVER-02


Log in as root in both VMs namely SERVER-01 (172.16.10.1) and SERVER-02 (176.16.10.2) and run the following commands. Pay attention to the IP addresses and port numbers that are being pass on each Server VM.


SERVER-01 (172.16.10.1)

Run the commands listed below on SERVER-01

# yum install –y open-vm-tools net-tools wget bridge-utils

# vi /etc/selinux/config

-----

SELINUX=disabled

-----

# systemctl stop firewalld.service

# systemctl disable firewalld.service

# yum –y update ; sync ; sync ; reboot

# yum install –y docker

# systemctl enable docker; 

# yum –y update ; sync ; reboot

# ifconfig –a

# systemctl status –l docker

# docker run –d --restart=unless-stopped –p 8080:8080 –p 9345:9345 rancher/server:stable \

--db-host mysql.rancher.local --db-port 3306 \

--db-user rancher-user --db-pass rancher-pass --db-name rancherdb \

--advertise-address 172.16.10.1


SERVER-02 (172.16.10.2)

Run the commands listed below on SERVER-02

# yum install –y open-vm-tools net-tools wget bridge-utils

# vi /etc/selinux/config

-----

SELINUX=disabled

-----

# systemctl stop firewalld.service

# systemctl disable firewalld.service

# yum –y update ; sync ; sync ; reboot

# yum install –y docker

# systemctl enable docker;

# yum –y update ; sync ; reboot

# ifconfig –a

# systemctl status –l docker

# docker run –d --restart=unless-stopped –p 8080:8080 –p 9345:9345 rancher/server:stable \

--db-host mysql.rancher.local --db-port 3306 \

--db-user rancher-user --db-pass rancher-pass --db-name rancherdb \

--advertise-address 172.16.10.2
RancherDB verification


From JUMPBOX VM, ssh into MYSQL VM as root, run mysql client command and verify that the RancherDB database was created and populated. This is just a sanity check.


JUMPBOX# ssh root@172.16.10.14 <--- 1FieldDay-IO is the password

MYSQL# mysql -uroot -p <--- 1FieldDay-IO is the password

MariaDB [(none)]> show databases;

MariaDB [(none)]> show tables;

MariaDB p(none)]> quit


Kubernetes by Rancher Labs

Movie Analogy

Cooking Analogy

Passionate Individuals

Partner Engineering

Product Management

Technical Marketing

Technical Account Managers

Field Enablement

Consulting Architects

Sales Engineers

Sales Engineers


Our Master-VM framework provides you an alternate and cost-effective way of carrying your demos and proof-of-concepts with you on your customer visits which instantly become your sales tools.

Your sales cycles can be much shortened by leaving your portable servers at your customer site for them to play with your stack if needed, rather than try building sandboxes for them on Cloud and then baby sitting them.

You no longer need to burn midnight oil in preparing for your next day demo. But instead a single Master-VM can build your demos and poc’s with all the use cases that you see fit. This way you can showcase product capabilities effectively and quicker.

Passionate Individuals

Our true definition of success as a viable business is to enable individuals like you who have that fire in your belly to learn what we offer as self-paced labs, no matter where you live and what you speak.

Our end goal is to hand deliver Master-VMs through our subscription model so that you can self-learn to your heart’s content.

Partner Engineering

It’s always great to be in the partner engineering team guiding partners what to do and which way to go.

But at times, you yourself is at lost when it comes to producing your own deliverables namely SETs / Solutions Enablement Kits (or whatever your company calls them) because you’ll soon end up becoming dependent on other teams like technical marketing, product management, field enablement and so on.

By using the same Master-VM framework that the rest of the company uses, you can lock step and be on the same page with the rest of the teams. With this approach you can get your deliverables out the door on time and bring up partners on board in a consistent manner.

Product Management

You know what it means to be in the product management, how you are expected to have all the answers all the time and how everything becomes your action item.

One of the most challenging part of being a product manager is to assimilate all the information from the engineering and then spread it within the company as well as with your customers.

With our Master-VM framework, your products no longer have to live within powerpoints or wiki pages or in webex recordings. Your entire product stack with all its uses cases can come to life by packaging them into a single Master-VM along with evaluation licenses. And that can be distributed quickly in a USB thumb drive to all the relevant teams. That way, no one has to bother you on corridors or cafeteria asking for demos or product details anymore.  Just point them to its Master-VM and that will take care of everything.

Technical Marketing

Technical marketing teams are expected to churn out reference architectures and white papers like pan cakes expect, nobody knows what it takes in producing your deliverables and how much you are dependent on having your own internal labs.

One of the major challenge you often face is showcasing your product capabilities and their integration with other products within your company as well as from partners and competitors. Once you figured that out, next comes the real challenge of disseminating that information to the rest of the world.

Our Master-VM framework gives you great flexibility in packing all your findings, recommendations, configurations, documentations, video/webex recordings – all in just one single VM (we call that Master-VM). It is upon us to get that delivered to your end customer, be it internal or external. This way, we completely eliminate the challenges in either opening up your internal labs for public consumption or burn your pockets by running them on a public cloud 24/7.

Consulting Architects


The management wants professional services organization to be a cash cow for the company. But somehow doesn’t want to spend on the required technical training (?!)  Ask them for a training and all you hear are budgets cuts, quarterly endings and cost cutting.

We understand your world. And that is why we kept all your training requirements as the fundamental corner stone while designing our Master-VM framework. You no longer need to convince your reporting chain all the way up to a VP to get the required training. All you need is your laptop, your physical server, your time commitment and the rest is on us.

In fact, for some of the self-paced labs that we have designed, we have even eliminated dependency on an internet connection! That way, you can be in  hotel room in a different country altogether, but you can still spend a few hours wisely in learning the product capabilities of your choice using our Master-VM framework.

Technical Account Managers

As as TAM your neck is always on the line. Customers expect you to solve all their problems in a jiffy. You’ll end up becoming their sandbag taking all the blows and punches. But when it comes to training a TAM,  it always seemed to be an after thought.

With all your hectic schedules and meeting up with customers face-to-face constantly, attending a full 5 day training course eventually becomes a pipe dream. You hate being dependent on someone else to help you out on the technical side of things as you never had the time to free up yourself in learning what you’re expected to know in the first place.

With our Master-VM framework, you can do your self-directed learning in your own pace. Since you are running the self-paced labs locally, you can always pause and continue your lab exercises without over lapping your work schedules. This way you can always keep up with product features and limitations first hand and deal the customers confidently.

Field Enablement


Though Architecting heterogeneous solutions have its own challenges, the primary hurdle that many Architects face is a lack of exposure to such systems.

With Master-VM framework, we build self-paced labs anywhere between the simplest to the most complicated architectures involving multiple software/hardware components from multiple vendors. Our Master-VM approach gives great flexibility, exposure and confidence in building such complex architectural solutions.

The video lessons that come bundled with any Master-VM will save your precious time in not getting yourself lost by wandering on the net looking for clues/answers but stay laser focused on mastering the concepts quickly without any diversion.