Getting my hands on VMware Photon Platform 1.2 (Part 1)
Author: Ananda Kammampati
I have been trying to self-learn VMware Photon Platform 1.2 from online documentation and from Cormac Hogan’s blog postings. Cormac has done an excellent job in hand holding beginners like me in introducing to the platform (Thanks Cormac). What I have here is to share some details on the way I built the same on my Intel NUC. This is by no means a step-by-step installation guide (will do one later) but something that can be used as a reference document to some extent, if you intend to build it locally on your own server from scratch.

1) My physical setup is simple (in my opinion). I use Intel NUC running VMware ESXi 6.0. I connect it with my MacbookPro with a crossover cable back-to-back. I define a dedicated network between the two. I then built the entire Photon platform 1.2 on my NUC, accessing it from my Mac. I find this way of learning any distributed systems very effective - be it Photon, Docker Swarm, Mesos, Cassandra, Big Data, Openstack, Kubernetes and such (William Lam and Tai Ratcliff have excellent blogs postings on Intel NUCs, among other things)
2) I run nested ESXi VMs for hosts whenever possible. Though they are not officially supported, they are probably the best way for training and educational purposes. You just need to have a reasonably powerful server at your disposal to run them efficiently.
3) First, pay close attention to DNS server setup. That is where I got lost and went in circles because I already have a DNS server running and I was pointing all my VMs to my DNS server, prior to installing Photon platform 1.2. The confusion arises because Photon platform 1.2 offers its own DNS service with its “Lightwave” VM that gets installed as part of the platform. And you are expected to configure Photon installer’s YAML file pointing to Lightwave DNS service (which doesn’t exist yet) and NOT to your existing DNS server.
4) I got all the required VMs in place, before I started installing Photon 1.2. This is my NUC setup.

5) I have seen many articles that teach how to build and run everything in a single virtual machine. IMHO, that is the most inefficient way of learning any distributed systems. It’s like aiming to compete for Olympics swimming but practicing in a bathtub. Only when we try building distributed systems in a distributed manner (different components in different physical or virtual servers), we will get exposed to all the intricacies involved. Running nested ESXi hosts along with multiple VMs on a single physical server, is probably the cheapest and cost effective way to get such an exposure (again, just my opinion). To that end, I have 11 VMs running on my NUC out of which, 6 of them are nested ESXi VMs.

- DNS – CentOS7 VM running FreeIPA for DNS
- EDGE – VM running EFW distribution, configured as network Gateway
- JUMPBOX –This is your landing spot, from where you do all your activities and has visibility and access to all the VMs
- OPENFILER – VM serving storage to all the nested ESXi VM hosts via iSCSI
- MGMT-VMs – Three nested ESXi VMs (version ESXi 6.5.0 build 4887370) that host virtual machines which make up the management components of Photon platform 1.2 (photon-controller VMs, lightwave VMs, load balancer VM)
- CLOUD-VMs – Three nested ESXi VMs (version ESXi 6.5.0 build 4887370) that host virtual machines which makes up the Kubernetes stack (master VM, etcd VM, load balancer VM, Worker VMs)
- INSTALLER – The appliance that you download from VMware's website that installs Photon Platform 1.2
6) I confess, I didn’t spend much time in optimizing the configurations of individual virtual machines, which might have gotten a better performance. But for now this is what I came up with, to keep myself going.


7) Here are the details of the virtual machines that will eventually run on nested ESXi VMs that make up photon platform 1.2. Later you will see the same information defined in the YAML file (pc-config.yaml) that will be used in the INSTALLER

8) As I have mentioned earlier, I have a DNS Server running, prior to installing Photon platform 1.2


9) Since NSX and vSAN for Photon platform 1.2 are not open source and are not freely downloadable, I built the platform with Openfiler to serve storage needs via iSCSI to all nested ESXi VMs (both the management hosts and Cloud hosts)

10) Let’s gets started with the configuration of YAML file
From JUMPBOX, I ssd’ed into the Photon-1.2 INSTALLER and modified the YAML file (location shown below) to reflect my current setup (You can do this directly on the console of INSTALLER as well). Once YAML file is configured properly, pass that to the “photon-setup” command (downloadable from VMware ) in building Photon platform 1.2
INSTALLER# ls /opt/vmware/photon/controller/share/config/pc-config.yaml
11) I will try to break down the YAML file for brevity. There are two aspects to this YAML file:
a) The contents should reflect your current setup (IP addresses, passwords and such)
b) It should then define where and how each component of Photon platform 1.2 should be installed and configured
12) In my setup, “Filer-Datastore” is the iSCSI Datastore that is being served by the OPENFILER to all the nested ESXi host VMs
13) Here I define the nested ESXi VMs meant to run the management components of Photon platform 1.2. Note that all entries point to 172.16.10.251 which is the IP address of the soon-to-be-created “Lightwave” VM (and not pointing to my already running DNS Server, which is 172.16.10.250)

14) The next section defines the nested ESXi VMs meant to run the workloads (Cloud hosts). Here is where Kubernetes stack gets installed (master, etcd, load balancer, and worker nodes)

15) I am installing two instances of Lightwave VMs for redundancy. Pay attention to the Primary and Secondary DNS entries. For the first instance of Lightwave VM (lightwave-1.photon.local), I use its own IP Address as primary (172.16.10.251) and for the secondary Lightwave VM, I point to my already existing DNS server (172.16.10.250)

16) For the second instance of Lightwave VM (lightwave-2.photon.local) I set the IP address of the first instance of Lightwave VM (172.16.10.251) as the Primary DNS server and it’s own IP Address (172.16.10.252) as the secondary DNS server

17) The next three sub-sections define three instances of photon-controllers. For all three instances, 172.16.10.251 (lightwave-1.photon.local) is the primary and 172.16.10.252 (lightwave-2.photon.local) is the secondary DNS server

18) Defining the second instance of Photon Controller

19) Defining the third instance of Photon Controller

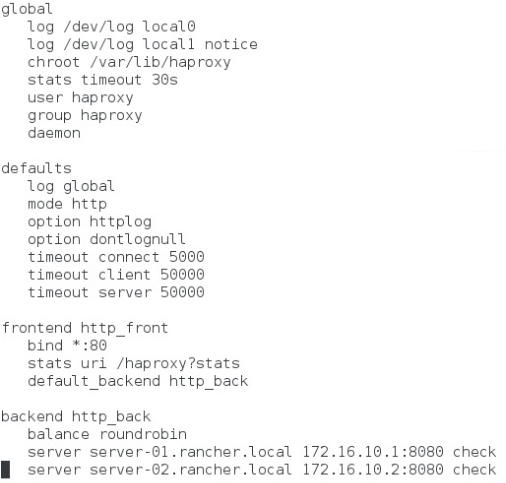
20) And now, defining the Load Balancer to access Photon platform’s management UI

21) Installation of NSX has to be done prior to installing Photon platform 1.2. But it is this same YAML file where NSX needs to be defined, so that it can be used/consumed by Photon Platform 1.2. Since I don’t have access to NSX or vSAN bits to play with, I am skipping them both. ( Appreciate if anybody can help me get them for evaluation 🙂 Will be glad to document and share it with a wider audience, if that is ok )
22) Now I run the following command on the INSTALLER
INSTALLER# photon-setup platform install –config /opt/vmware/photon/controller/share/config/pc-config.yaml
Run a “tail” command on the installer log file to see the progress
INSTALLER# tail –f /var/log/photon-installer.log
23) Once the installation completes, open up the browser in JUMPBOX with multiple tabs, each pointing to a different nested ESXi host VMs. Now you will see the photon controllers VMs, lightwave VMs and Load Balancer VM – all distributed and running on different nested ESXi VMs (management hosts - MGMT-01, MGMT-02, MGMT-03), exactly how it is defined in the YAML file


24) From JUMPBOX, point the browser to Lightwave VM. Enter the domain name photon.local with credentials as defined in the YAML file
https://172.16.10.251/lightwaveui/
Login: administrator@photon.local
Password: 1FieldDay-IO


25) And finally, from the JUMPBOX, point browser to the IP address of the Load balancer: 172.16.10.100 and enter the same credentials
https://172.16.10.100:4343/
Login: administrator@photon.local
Password: 1FieldDay-IO

26) Something subtle that is worth mentioning. While passwords for all my VMs (except the INSTALLER) is FieldDay-IO , for Lightwave VMs the password is 1FieldDay.IO .The reason being, Lightwave VM is strict about having a numeric value as part of it's password. INSTALLER VM's default password is changeme
I have now reached my first milestone where the installation of Photon platform 1.2 ends and the journey towards installing Kubernetes on Cloud hosts begin, which I will continue in my next article.
Hope this helps.